Share
Pin
Tweet
Send
Share
Send
![](http://img.uaft2404.org/img/sdela-2019/rozhdestvenskij-venok-iz-vetok-i-palochek.jpg)
- Twigs and sticks 5-7 cm long.
- Acrylic paint in white.
- A sheet of paper or cardboard.
- Brush
- Glue gun.
- Various Christmas decorations for decor.
- Pine cones.
- Silver ribbon.
- Felt Christmas toy.
![](http://img.uaft2404.org/img/sdela-2019/rozhdestvenskij-venok-iz-vetok-i-palochek-2.jpg)
1. For the manufacture of this wreath you will need wooden sticks of different thicknesses, cut into pieces. Immediately prepare curved twigs of interesting shapes and sticks with knots.
![](http://img.uaft2404.org/img/sdela-2019/rozhdestvenskij-venok-iz-vetok-i-palochek-3.jpg)
2.Each stick carefully paint on all sides with white paint. You can just dip the branches in acrylic, use a brush or sponge. Acrylic paint is practically odorless and dries very quickly, so the painting process will not cause any difficulties.
![](http://img.uaft2404.org/img/sdela-2019/rozhdestvenskij-venok-iz-vetok-i-palochek-4.jpg)
![](http://img.uaft2404.org/img/sdela-2019/rozhdestvenskij-venok-iz-vetok-i-palochek-5.jpg)
3. Leave the branches for at least 1 hour until the paint has completely dried.
![](http://img.uaft2404.org/img/sdela-2019/rozhdestvenskij-venok-iz-vetok-i-palochek-6.jpg)
4. Take a sheet of cardboard and draw a circle of the desired size on it. You can focus on it in the process of making a wreath.
![](http://img.uaft2404.org/img/sdela-2019/rozhdestvenskij-venok-iz-vetok-i-palochek-7.jpg)
5. We begin to form the basis of the wreath. Spread sticks along a circle drawn on cardboard. To do this, choose more even pieces that fit well.
![](http://img.uaft2404.org/img/sdela-2019/rozhdestvenskij-venok-iz-vetok-i-palochek-8.jpg)
![](http://img.uaft2404.org/img/sdela-2019/rozhdestvenskij-venok-iz-vetok-i-palochek-9.jpg)
6. Having finished laying out the first circle, proceed to the second. Place the sticks as close to each other as possible.
![](http://img.uaft2404.org/img/sdela-2019/rozhdestvenskij-venok-iz-vetok-i-palochek-10.jpg)
7. When the base of the wreath is ready, begin to lay out the transverse sticks. Use a glue gun to lock them. Carefully look at where the sticks touch and glue them.
![](http://img.uaft2404.org/img/sdela-2019/rozhdestvenskij-venok-iz-vetok-i-palochek-11.jpg)
![](http://img.uaft2404.org/img/sdela-2019/rozhdestvenskij-venok-iz-vetok-i-palochek-12.jpg)
![](http://img.uaft2404.org/img/sdela-2019/rozhdestvenskij-venok-iz-vetok-i-palochek-13.jpg)
8. Continue adding sticks to the wreath, making it voluminous. Glue each new layer carefully.
![](http://img.uaft2404.org/img/sdela-2019/rozhdestvenskij-venok-iz-vetok-i-palochek-14.jpg)
![](http://img.uaft2404.org/img/sdela-2019/rozhdestvenskij-venok-iz-vetok-i-palochek-15.jpg)
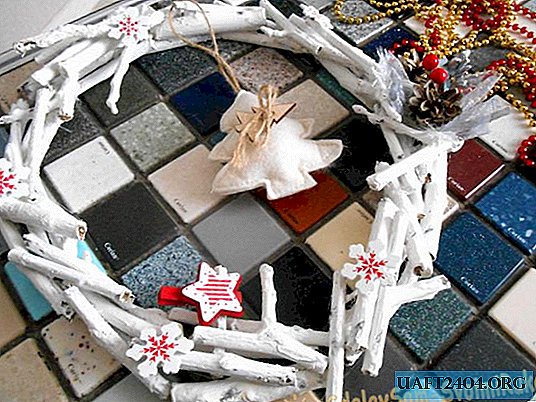
9. Lastly, glue thinner and curved branches. Thanks to this, the wreath will look more interesting.
![](http://img.uaft2404.org/img/sdela-2019/rozhdestvenskij-venok-iz-vetok-i-palochek-16.jpg)
![](http://img.uaft2404.org/img/sdela-2019/rozhdestvenskij-venok-iz-vetok-i-palochek-17.jpg)
10. Go to the decoration of the wreath. It is best to use white painted wooden decorations. Place wooden snowflakes on a wreath and glue with a glue gun.
![](http://img.uaft2404.org/img/sdela-2019/rozhdestvenskij-venok-iz-vetok-i-palochek-18.jpg)
![](http://img.uaft2404.org/img/sdela-2019/rozhdestvenskij-venok-iz-vetok-i-palochek-19.jpg)
11. A composition of cones will look beautiful on a wreath. Glue a few small cones next to it.
![](http://img.uaft2404.org/img/sdela-2019/rozhdestvenskij-venok-iz-vetok-i-palochek-20.jpg)
![](http://img.uaft2404.org/img/sdela-2019/rozhdestvenskij-venok-iz-vetok-i-palochek-21.jpg)
12. From a piece of silver ribbon make a bow and glue next to the cones.
![](http://img.uaft2404.org/img/sdela-2019/rozhdestvenskij-venok-iz-vetok-i-palochek-22.jpg)
![](http://img.uaft2404.org/img/sdela-2019/rozhdestvenskij-venok-iz-vetok-i-palochek-23.jpg)
13. Decorate the composition with shiny snowflakes and other decorative elements.
![](http://img.uaft2404.org/img/sdela-2019/rozhdestvenskij-venok-iz-vetok-i-palochek-24.jpg)
![](http://img.uaft2404.org/img/sdela-2019/rozhdestvenskij-venok-iz-vetok-i-palochek-25.jpg)
![](http://img.uaft2404.org/img/sdela-2019/rozhdestvenskij-venok-iz-vetok-i-palochek-26.jpg)
14.In the center of the wreath, place one large element. It can be a wooden or felt Christmas toy.
![](http://img.uaft2404.org/img/sdela-2019/rozhdestvenskij-venok-iz-vetok-i-palochek-27.jpg)
![](http://img.uaft2404.org/img/sdela-2019/rozhdestvenskij-venok-iz-vetok-i-palochek-28.jpg)
![](http://img.uaft2404.org/img/sdela-2019/rozhdestvenskij-venok-iz-vetok-i-palochek-29.jpg)
![](http://img.uaft2404.org/img/sdela-2019/rozhdestvenskij-venok-iz-vetok-i-palochek-30.jpg)
![](http://img.uaft2404.org/img/sdela-2019/rozhdestvenskij-venok-iz-vetok-i-palochek-31.jpg)
![](http://img.uaft2404.org/img/sdela-2019/rozhdestvenskij-venok-iz-vetok-i-palochek-32.jpg)
Share
Pin
Tweet
Send
Share
Send