Share
Pin
Tweet
Send
Share
Send
The device that I want to introduce you today is not a large scheme for adjusting the start and stop of the load, in our case, lighting, interior lighting, dashboard lighting, etc. Our device will allow you to smoothly turn on and off any of the listed loads. Agree much nicer when when you turn on the ignition, we see not a sharp turn on the dashboard lights, but a smooth ignition. The same can be said about interior lighting and lighting fixtures.
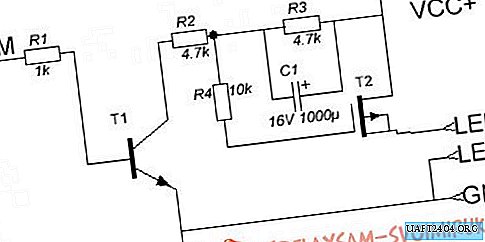
Let’s get down to business and, before starting the assembly, I suggest that you familiarize yourself with the scheme:

First, I’ll talk about how it connects. To VCC + we need to bring a constant 12 V from the battery, which will feed our load. To REM we connect those 12 V that appear after the ignition is turned on, it is they who will initiate the ignition and, upon their disappearance, the circuit will turn off the lighting. Accordingly, we connect our load to the LED + LED contacts- (in my case, the LEDs)
As a transistor T1, I used BC817 (an analogue of KT503V) as a T2, I took IRF9540S. If you want to increase the ignition time, you need to increase the nominal value of R2, to reduce accordingly, lower it. To control the blanking time, a similar operation must be done with resistor R3.
Now you can proceed to the assembly. To reduce the size of the device, I used surface mount.
Here is the whole set of elements that I needed:

The boards were made according to the "LUT" technology from one-sided textolite.


Here is such a compact device that can add aesthetics to our car, we got in the end.
Costs:
1. Resistors 0.25 rub pc. x4 = 1 Rub
2. BC817 = 3 rubles.
3. IRF9540S = 35 rubles
4. Capacitor 8 rub
5. Terminals 21.5
Bottom line: Just for 70 rubles. we get a pretty interesting device.
P. S. Video with the operation of the device:
Share
Pin
Tweet
Send
Share
Send


